Multi-Stage Sketches
Introduction
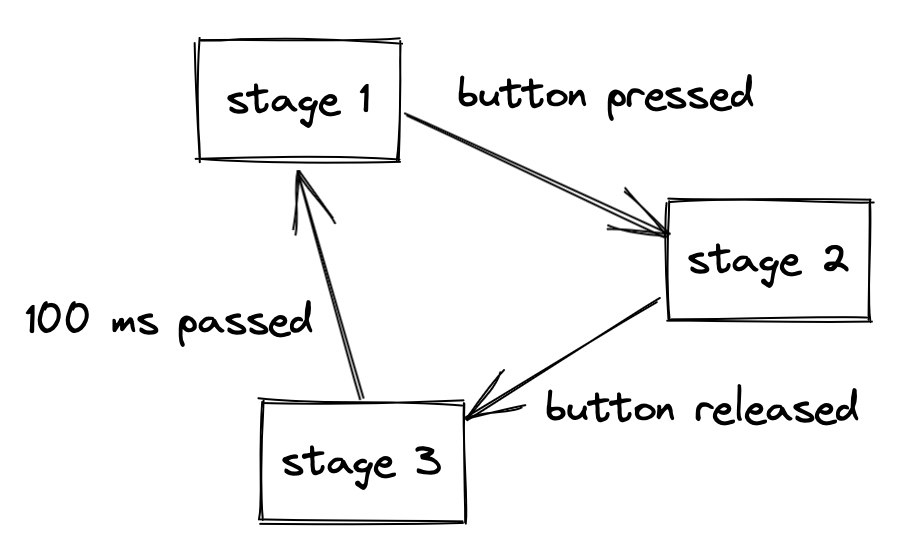
Here’s a sketch with three different stages. Each stage acts like a mini-sketch. It has its own behavior, and is implemented by its own code*.* There is a rule for when to change to a different stage.
The program’s knowledge of which stage it is in at the moment is part of its program state. This state is stored in a variable (stage).
This particular sketch could be written more simply, by putting everything inside of loop(). (There is an example of this at the end of this document.) This is because each of the stages is very simple. This pattern also works for larger and more complicated sketches, though.
const int PIN_LED_1 = 13;
const int PIN_LED_2 = 4;
const int PIN_BUTTON = 5;

int stage = 1;

void setup() {
  pinMode(PIN_BUTTON, INPUT);
  pinMode(PIN_LED_1, OUTPUT);
  pinMode(PIN_LED_2, OUTPUT);
}

void loop() {
  switch (stage) {
    case 1:
      stage1();
      break;
    case 2:
      stage2();
      break;
    case 3:
      stage3();
      break;
  }
}

// Stage 1:
// LED 1 is on, LED 2 is off.
// If the button is pressed, advance to stage 2.
void stage1() {
  digitalWrite(PIN_LED_1, HIGH);
  digitalWrite(PIN_LED_2, LOW);
  if (digitalRead(PIN_BUTTON) == HIGH) {
    stage = 2;
  }
}

// Stage 2:
// LED 1 is off, LED 2 is on.
// If the button is released, advance to stage 3.
void stage2() {
  digitalWrite(PIN_LED_1, LOW);
  digitalWrite(PIN_LED_2, HIGH);
  if (digitalRead(PIN_BUTTON) == LOW) {
    stage = 3;
  }
}

// Stage 3:
// Both LEDs are on.
// Delay for 100 millis, then advance to to stage 1.
void stage3() {
  digitalWrite(PIN_LED_1, HIGH);
  digitalWrite(PIN_LED_2, HIGH);
  delay(100);
  stage = 1;
}
Combining Sketches into Stages
Anatomy of a Sketch
A sketch has these parts:
- Include statements
#include - Variable declarations
setup()loop()- other functions
Merge each of these sections. For example, combine the variable declarations from the source sketches into the variable declaration section of the combined sketch. (The next subsection will illustrate this.)
The Merge
The example at the top of the page has three stages.
For this example, of how to combine sketches into a single multi-stage sketch, we’ll combine just two sketches:
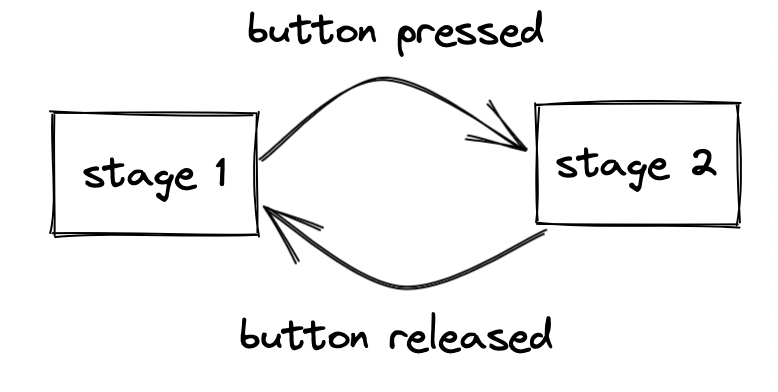
- In sketch 1 (which will become stage one of the combined sketch), the LED is on. Pressing the button prints “stage 2” to the serial port, but we will change this to set the stage to stage 2.
- In sketch 2 (which will become stage one of the combined sketch), the LED is off. Releasing the button prints “stage 2” to the serial port, but we will change this to set the stage to stage 1.
// sketch 1
const int PIN_LED = 13;
const int PIN_BUTTON = 5;

void setup() {
  Serial.begin(9600);
  pinMode(PIN_BUTTON, INPUT);
  pinMode(PIN_LED, OUTPUT);
}

void loop() {
  digitalWrite(PIN_LED, HIGH);
  if (digitalRead(PIN_BUTTON) == HIGH) {
    Serial.println("move to stage 2");
    // TODO: set to stage 2
  }
}
// sketch 2
const int PIN_LED = 13;
const int PIN_BUTTON = 5;
void setup() {
Serial.begin(9600);
pinMode(PIN_BUTTON, INPUT);
pinMode(PIN_LED, OUTPUT);
}
void loop() {
digitalWrite(PIN_LED, HIGH);
if (digitalRead(PIN_BUTTON) == HIGH) {
Serial.println("move to stage 1");
// TODO: set to stage 1
}
}
Combine the circuits
Sketch 1 and sketch 2 each require a circuit with a button and an LED. To combine them, we need to decide: do they use the same button or two different buttons. Do they use the same LED or two different LEDs?
There’s no right answer to this question – it depends on the design intent for the combined sketch.
For this example, let’s decide:
- The stages will use the same button
- The stages will use two different LEDs
(We could repeat this exercise with different choices for these answers, to create [slightly different] code for the combined sketch.)
Rename variables
Sketch 1 is written for a button on pin 5. Sketch 2 is also written for a button on pin 5. Since (we have decided that) in the combined sketch these are different buttons, we need to modify one of the sketches to use a different pin. We will modify sketch #2. The only change is the value of PIN_BUTTON.
// sketch 2
const int PIN_LED = 13;
const int PIN_BUTTON = 6;

void setup() {
  Serial.begin(9600);
  pinMode(PIN_BUTTON, INPUT);
  pinMode(PIN_LED, OUTPUT);
}

void loop() {
  digitalWrite(PIN_LED, HIGH);
  if (digitalRead(PIN_BUTTON) == HIGH) {
    Serial.println("move to stage 1");
    // TODO: set to stage 1
  }
}
Now, there is a problem that PIN_BUTTON is sketch 1 has one value (and refers to one pin), and the variable with the same name, PIN_BUTTON, in sketch 2 has a different value (and refers to a different pin). We can’t merge them, because they use the same variable in conflicting ways. To fix this, rename PIN_BUTTON in sketch #2. [We could rename it in sketch 1, sketch 2, or in both sketches – so long as we don’t rename both sketches’ variable to the same new name.]
// sketch 2
const int PIN_LED = 13;
const int PIN_BUTTON_2 = 6;

void setup() {
  Serial.begin(9600);
  pinMode(PIN_BUTTON_2, INPUT);
  pinMode(PIN_LED, OUTPUT);
}

void loop() {
  digitalWrite(PIN_LED, HIGH);
  if (digitalRead(PIN_BUTTON_2) == HIGH) {
    Serial.println("move to stage 1");
    // TODO: set to stage 1
  }
}
We can tell from the code that both sketch 1 and sketch 2 are written to use an LED on pin 13. They also use the same variable name, PIN_LED, to refer to that pin. Since in the combined sketch, the sketch 1 (stage 1) LED and the sketch 2 (stage 2) LED are the same LED, that’s fine – we don’t need to do any further preparation to merge the sketches.
Combine the #include statements
In these sketch, there are no #include statements, so there won’t be any #include statements in the combined program either.
Combine the variable declarations
The first step is to simply append the declarations from sketch 1 and the declarations from sketch 2.
// sketch 1
const int PIN_LED = 13;
const int PIN_BUTTON = 5;

// sketch 2
const int PIN_LED = 13;
const int PIN_BUTTON_2 = 6;
Now eliminate the duplicates. PIN_LED is defined twice, with the same value. (If it were defined with two different values, that means that we didn’t prepare the sketches correctly, by renaming variables that appeared in both.) We will also update the comments about which sketch each block of declarations came from, but it would be reasonable to remove the entirely.
const int PIN_LED = 13;

// stage 1
const int PIN_BUTTON = 5;

// stage 2
const int PIN_BUTTON_2 = 6;
Introduce a Stage variable
const int PIN_LED = 13;

// stage 1
const int PIN_BUTTON = 5;

// stage 2
const int PIN_BUTTON_2 = 6;

int stage = 1;
Combine the setup()s
// sketch 1
void setup() {
  Serial.begin(9600);
  pinMode(PIN_BUTTON, INPUT);
  pinMode(PIN_LED, OUTPUT);
}
// sketch 2
void setup() {
Serial.begin(9600);
pinMode(PIN_BUTTON_2, INPUT);
pinMode(PIN_LED, OUTPUT);
}void setup() {
// sketch 1
Serial.begin(9600);
pinMode(PIN_BUTTON, INPUT);
pinMode(PIN_LED, OUTPUT);
// sketch 1
Serial.begin(9600);
pinMode(PIN_BUTTON_2, INPUT);
pinMode(PIN_LED, OUTPUT);
}Some things aren’t necessary to do twice. Remove the duplicates:
void setup() {
  Serial.begin(9600);
  pinMode(PIN_BUTTON, INPUT);
  pinMode(PIN_BUTTON_2, INPUT);
  pinMode(PIN_LED, OUTPUT);
}
Rename each loop() functions to → stage*n*()
Copy the loop() functions from the separate sketches into the combined sketch, and rename them to stage1(), stage2(), etc.
// sketch 1
void loop() {
  digitalWrite(PIN_LED, HIGH);
  if (digitalRead(PIN_BUTTON) == HIGH) {
    Serial.println("move to stage 2");
    // TODO: set to stage 2
  }
}
// sketch 1
void stage1() {
digitalWrite(PIN_LED, HIGH);
if (digitalRead(PIN_BUTTON) == HIGH) {
Serial.println("move to stage 2");
// TODO: set to stage 2
}
}// sketch 2
void loop() {
digitalWrite(PIN_LED, HIGH);
if (digitalRead(PIN_BUTTON_2) == HIGH) {
Serial.println("move to stage 1");
// TODO: set to stage 1
}
}// sketch 2
void stage2() {
digitalWrite(PIN_LED, HIGH);
if (digitalRead(PIN_BUTTON_2) == HIGH) {
Serial.println("move to stage 1");
// TODO: set to stage 1
}
}Put them all into the merged sketch:
void stage1() {
  digitalWrite(PIN_LED, HIGH);
  if (digitalRead(PIN_BUTTON) == HIGH) {
    Serial.println("move to stage 2");
    // TODO: set to stage 2
  }
}

void stage2() {
  digitalWrite(PIN_LED, HIGH);
  if (digitalRead(PIN_BUTTON_2) == HIGH) {
    Serial.println("move to stage 1");
    // TODO: set to stage 1
  }
}
Find the places where the program should switch to a different stage, and add to each of these a statement that assigns the new stage number to the stage variable.
void stage1() {
  digitalWrite(PIN_LED, HIGH);
  if (digitalRead(PIN_BUTTON) == HIGH) {
    Serial.println("move to stage 2");
    stage = 2;
  }
}

void stage2() {
  digitalWrite(PIN_LED, HIGH);
  if (digitalRead(PIN_BUTTON_2) == HIGH) {
    Serial.println("move to stage 1");
    stage = 1;
  }
}
Add a new loop function, that calls each of the stage*n*() functions, no matter how many there are. (In our case there are two.)
void loop() {
  switch (stage) {
    case 1:
      stage1();
      break;
    case 2:
      stage1();
      break;
  }
}
The Final Sketch
The combined, multi-stage sketch.
const int PIN_LED = 13;
const int PIN_LED_2 = 13;
const int PIN_BUTTON = 5;

int stage = 1;

void setup() {
  Serial.begin(9600);
  pinMode(PIN_BUTTON, INPUT);
  pinMode(PIN_LED, OUTPUT);
}

void loop() {
  switch (stage) {
    case 1:
      stage1();
      break;
    case 2:
      stage2();
      break;
  }
}

// Stage 1:
// The LED is on.
// If the button is pressed, advance to stage 2.
void stage1() {
  digitalWrite(PIN_LED, HIGH);
  if (digitalRead(PIN_BUTTON) == HIGH) {
    Serial.println("move to stage 2");
    stage = 2;
  }
}

// Stage 2:
// The LED is off.
// If the button is released, move to stage 1.
void stage2() {
  digitalWrite(PIN_LED, LOW);
  if (digitalRead(PIN_BUTTON) == LOW) {
    Serial.println("move to stage 2");
    stage = 1;
  }
}
Appendix: The Non-Stage Version
Here is the sketch from the example at the top of the page, rewritten not to use a stage variable. Instead of using a variable to represent the current stage, as the first example did, this sketch uses the line of code that is being executed to represent the stage. While the Arduino is executing code in the first stanza (the first four non-comment lines) of loop(), “the sketch is in stage 1. While it is executing code in the second stanza, the sketch is in stage 2. While it is executing code in the third stanza, the sketch is in 3. Then the Arduino stops executing at the end of loop(), and starts again at the beginning, so that it is back in stage 1.
This version is easier to understand. However, it can only accommodate simple rules for getting from one stage to another. And, it can be more difficult to combine contributions from multiple people, if the code is combined into one function like this.
const int PIN_LED_1 = 13;
const int PIN_LED_2 = 4;
const int PIN_BUTTON = 5;

void setup() {
  pinMode(PIN_BUTTON, INPUT);
  pinMode(PIN_LED_1, OUTPUT);
  pinMode(PIN_LED_2, OUTPUT);
}

void loop() {
  // Stage 1:
  // LED 1 is on, LED 2 is off.
  // If the button is pressed, advance to stage 2.
  while (digitalRead(PIN_BUTTON) != HIGH) {
    digitalWrite(PIN_LED_1, HIGH);
    digitalWrite(PIN_LED_2, LOW);
  }

  // Stage 2:
  // LED 1 is off, LED 2 is on.
  // If the button is released, advance to stage 3.
  while (digitalRead(PIN_BUTTON) == LOW) {
    digitalWrite(PIN_LED_1, LOW);
    digitalWrite(PIN_LED_2, HIGH);
  }

  // Stage 3:
  // Both LEDs are on.
  // Delay for 100 millis, then advance to to stage 1.
  digitalWrite(PIN_LED_1, HIGH);
  digitalWrite(PIN_LED_2, HIGH);
  delay(100);
}
©2020–2022 by Oliver Steele.