Serial Communication using SerialRecord
In this tutorial:
Credits: This tutorial is adapted from a tutorial by Marcela Godoy, that was developed for the Interaction Lab course at NYU Shanghai. It has been altered to use the SerialRecord for Arduino and SerialRecord for Processing libraries.
0. Setup
Follow the instructions to install these two libraries:
1. Arduino to Processing
1.1. Arduino to Processing: Arduino Example Code
Include the SerialRecord library. Create an instance of SerialRecord, that is set up to send or receive three values.
#include "SerialRecord.h"

SerialRecord serialRecord(3);
Start the communication using Serial.begin():
void setup() {
  Serial.begin(9600);
}
First, we will create variables for storing the values from each sensor. In the next example we are using three sensors connected to three different analog pins, so we use analogRead(), If we were reading values from a button, we would use digitalRead() instead. It will depend on what type of sensor you are using, so change the code accordingly.
void loop() {
  // to send values to Processing assign the values you want to send
  //this is an example
  int sensor1 = analogRead(A0);
  int sensor2 = analogRead(A1);
  int sensor3 = analogRead(A2);
Next, we need to find a way to send multiple values to the serial port. We will use the SerialRecord.send() function to do this. It will send them as a string of values separated by commas and terminated by a newline. For example 100,200,300\n. (In Arduino C++ and Java, as well as many other languages, \n represents the newline character, which has numeric representation 10.)
  serialRecord[0] = sensor1;
  serialRecord[1] = sensor2;
  serialRecord[2] = sensor3;
  serialRecord.send();
Finally, we might need to add a delay, but it will depend on the sensors you are using in your project.
1.2. Arduino To Processing: Processing Example Code
Begin the sketch by adding statements to import the Processing Serial Library, and the SerialRecord Library.
import processing.serial.*;
import osteele.SerialRecord.*;
Declare the variables that hold the serial port and the serial record. We will initialize those later.
Serial myPort;
SerialRecord serialRecord;
Start your setup code as you wish. You must include in the setup a function called setupSerial() that will contain the code to start the communication with Arduino. You may need to set the function up by defining the port name that your computer gives to your USB port.
void setup() {
  setupSerial();
}
Now define the setupSerial() function:
void setupSerial() {
  String serialPortName = SerialUtils.findArduinoPort();
  if (serialPortName == null) {
    exit();
    return;
  }
  serialPort = new Serial(this, serialPortName, 9600);
  // change the number on the next line to receive different numbers of values
  serialRecord = new SerialRecord(this, serialPort, 3);
}
This defines the number of sensor values you will be receiving from Arduino and creates a SerialRecord to store these values. In this example we are receiving three values, so the SerialRecord is initialized with a value of 3.
Now, run the code, to verify that it detects the port that the Arduino is connect to. If it cannot detect this port, it will print a warning, and display a list of ports as in the following screenshot:
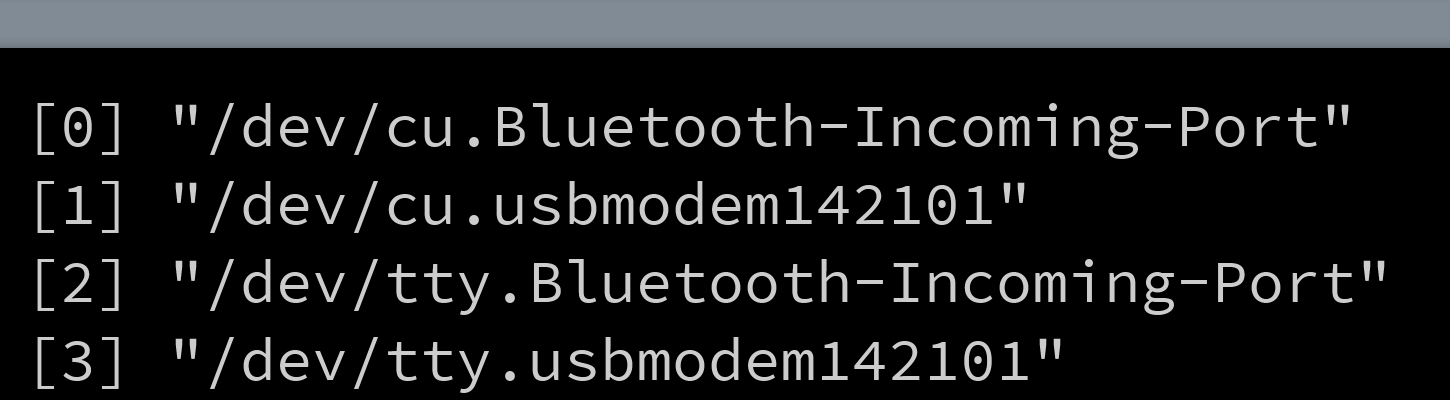
The Processing sketch console displays this if the sketch cannot figure out which port to use.
If this happens, replace the line String serialPortName = SerialUtils.findArduinoPort(); by String serialPortName = Serial.list()[*n*];, where n is the number from the list of ports that corresponds to your Arduino. For example, in the list above, port [1] has the name of a typical Arduino port, so use Serial.list()[1].
Now your Processing sketch is connected to the Arduino.
In the draw loop we will use a function serialRecord.read() to update the sensor values as they change.
void draw() {
  serialRecord.log(true);
  serialRecord.read();
}
Remember that the values from the sensors are stored in an array of variables and these variables will be filled with data according to the information we get from Arduino. This function splits the String containing all the sensor values every time there is a comma, and stops reading the String when it gets a line feed (value 10 in ASCII code). The line serialRecord.log(true) causes it to also print to the console the values that are received from the Arduino.
Finally, write your code that uses the values from the sensors. sensorRecord.values[0] is the value from the first sensor, sensorRecord.values[1] is the value from the second sensor, and sensorRecord.values[2] is the value from the third one.
void draw() {
  serialRecord.log(true);
  serialRecord.read();

  // use the values like this!
  // serialRecord.values[0]

  // add your code

  //
}
For example, if you want to draw a circle and change the size of that circle according to the values of the first sensor you are sending from Arduino, your code should look like this:
void draw() {
  serialRecord.log(true);
  serialRecord.read();

  circle(width/2, height/2, serialRecord.values[0]);
}
You will probably need to map the values according to what you are doing. For example, if the values you are receiving from the sensor correspond to values from a potentiometer, these values are in a range between 0 and 1023, then the size of the circle will grow outside the canvas. So you might want to map the potentiometer values to the minimum size for the circle to the maximum size you want the circle takes. Then, your code could be something like this:
  float size = map(serialRecord.values[0], 0, 1023, 0, width);
  circle(width/2, height/2, size);
You can now be creative and write the code for your project as you need.
Add this line to the bottom of the draw() function, to display the last line that has been sent to the Arduino, and the values that the Arduino thinks it has received:
serialRecord.draw();2. Processing To Arduino
2.1 Processing To Arduino: Processing Code
Begin the sketch by adding statements to import the Serial and SerialRecord libraries. (The Serial library is built into Processing. The SerialRecord library is the one that you installed in the setup instructions, above.)
import processing.serial.*;
import osteele.SerialRecord.*;
Declare the variables that hold the serial port and the serial record. We will initialize those later.
Serial myPort;
SerialRecord serialRecord;
Start your setup code as you wish. Change the size accordingly. Your setup() function must call a function setupSerial(), that will contain the code to start the communication with Arduino.
void setup() {
  size(500, 500);
  background(0);
  setupSerial();
}
You will find the setupSerial() function below. This function sets up the communication port. It attempts to discover which port to use automatically.
void setupSerial() {
  String serialPortName = SerialUtils.findArduinoPort();
  if (serialPortName == null) {
    exit();
    return;
  }
  serialPort = new Serial(this, serialPortName, 9600);
  // change the number on the next line to receive different numbers of values
  serialRecord = new SerialRecord(this, serialPort, 3);
}
Now, run the code, to verify that it detects the port that the Arduino is connect to.
If it cannot detect this port, it will print a warning, and display a list of ports as in the following screenshot:

If this happens, follow the instructions above, in the section Arduino to Processing: Processing Example Code.
Now your Processing sketch is connected with the Arduino.
Finally, write your own code to send values to Arduino. The draw() function should start as follows.
void draw() {
  background(0);

  // give values to the variables you want to send here
  // change the code according to your project
You will assign values to the array of values. serialRecord.values[0] is the first value, serialRecord.values[1] is the second value, and serialRecord.values[2] is the third value. The number of values in this array matches the number 3 in the call to new SerialRecord(this, serialPort, 3) , so the index number of the array goes from 0 to 2.
Let’s see an example. If you would like to control an output such as an LED connected to Arduino by checking whether the mouse is pressed, you can send 1 or 0. (The Arduino sketch would turn the LED on when Arduino receives 1 and off when Arduino receives 0.)
    if (mousePressed) {
      serialRecord.values[0] = 1;
    } else {
      serialRecord.values[0] = 0;
    }
Another example: If you would like to control the pitch and duration of a buzzer you can send the values of where the mouse is on the screen. You could use mouseX for controlling the pitch and mouseY to control the duration of the sound. Remember that you will need to map() the values either in Processing before you send them, or in Arduino when you get them. (The Processing SerialRecord SendMultipleValues sketch has an example of this.)
    serialRecord.values[1] = mouseX;
    serialRecord.values[2] = mouseY;
Finally, you need to send the values to Arduino with the function serialRecord.write(). Do not delete this line of code from the draw loop!
serialRecord.write();This function will send every value of your array to Arduino. (If you have called serialRecord.log(), it will also print to the console the values you are sending.)
Add this line to the bottom of the draw() function, to display the last line that has been sent to the Arduino, and the values that the Arduino thinks it has received:
serialRecord.draw();2.2 Processing To Arduino: Arduino Code
First you will include the SerialRecord library, and define the number of values you are receiving from Processing. In the previous example we are sending 3 values, so the value in serialRecord(3) is 3. Change the number 3 according to the number of values you are receiving.
#include "SerialRecord.h"

SerialRecord serialRecord(3);
This creates an array serialRecord.values to store the data from Processing.
Start the communication using Serial.begin(). Add any additional code that your project needs; for example, to initialize pins, or to work with other libraries.
void setup() {
  Serial.begin(9600);
}
For example, if you want to control a LED when you press the mouse, you should add the line pinMode in the setup:
void setup() {
  Serial.begin(9600);
  pinMode(13, OUTPUT);
}
In void loop you must include serialRecord.read(). This function will get the values coming from Processing and will place them into the array serialRecord.values that was created by the call to new SerialRecord(3) at the top of the sketch.
void loop() {
  serialRecord.read();
}
Get creative and write your own code using the elements in the values array. Consider the following example if you would like that when the mouse is clicked, a LED will turn on and a buzzer will play sound. You can control pitch sounds and duration of a buzzer through mouse position. Notice that we are mapping the values here.
if (serialRecord.values[0] == 1) {
  //turn on an LED when the mouse is pressed
  digitalWrite(13, HIGH);
  // map values from mouseX to frequency from (0 - 500 pixels)
  //to the output pitch range (120 - 1500Hz)
  int f = map(serialRecord.values[1], 0, 500, 120, 1500);
  // map values from mouseY to frequency from (0 - 500 pixels)
  //to the output duration range (10 - 2000 milliseconds)
  int d = map(serialRecord.values[2], 0, 500, 10, 2000);
  // play the pitch:
  tone(8, serialRecord.values[1], serialRecord.values[2]);
  delay(1);        // delay in between reads for stability
  } else {
     digitalWrite(13, LOW);
  }
  //end of example
}
3. Read and Write – Full Duplex
(Arduino and Processing are both sending and receiving data)
3.1 Full Duplex Arduino Code
Start out by specifying the number of values coming from Processing.
#include "SerialRecord.h"

SerialRecord receiver(3);
SerialRecord sender(2);
This creates an array of values for storing data from Processing, and another array of values to send to Processing.
In setup(), start serial communication with Serial.begin(). After that you can write whatever you need in your code according to your project.
void setup() {
  Serial.begin(9600);
}
For example, if you had an LED and a DC motor, these would be outputs and you would use pinMode(pin number, OUTPUT) for each of them. If you would like to have a button, so you can send this information to processing, you should set it up as an input when using pinMode().
void setup() {
  Serial.begin(9600);
  // this block of code is an example of an LED, a DC motor, and a button
  pinMode(13, OUTPUT);
  pinMode(9, OUTPUT);
  pinMode(2, INPUT);
  //end example
}
To receive a value from Processing, you must call the function receiver.read() in void loop. This function will get the values coming from Processing and will place them into the receiver array that we created at the beginning.
void loop() {
  receiver.read();
}
After that in the next example we will first demonstrate how to use received values from Processing. Doing so by allowing the first element (receiver[0]) from the values coming from Processing to turn the LED on or off. receiver[1] will control the speed of the DC motor. You can find more information on how to use the received values from Processing in section 2.2 Processing to Arduino.
if (receiver[0] == 1) {
  digitalWrite(13, HIGH);
} else {
  digitalWrite(13, LOW);
}
analogWrite(9, receiver[1]);
delay(10);
At the same time we will send data back to Processing from two sources: a potentiometer and a button. You can find more information on how to send values from Arduino in section 1.1 Arduino to Processing
int sensor1 = analogRead(A0); // a potentiometer
int sensor2 = digitalRead(2); // the button

sender[0] = sensor1;
sender[1] = sensor2;
sender.send();
3.2 Full Duplex Processing Code:
When you open your new Processing sketch, first you need to import the libraries used for serial communication.
import processing.serial.*;
import osteele.SerialRecord.*;
Then there will be two variables for storing the values: one to store values from Processing that will be sent to Arduino, the second to receive values from Arduino. In this example, we are telling Processing to expect to send two values to Arduino and to wait for receiving two different set of values from Arduino.
SerialRecord sender;
SerialRecord receiver;
We will create a serial port.
Serial myPort;Start the serial communication by calling the function setupSerial().
void setup() {
  setupSerial();
}
You will find the setupSerial() function below. This sets up the communication port, and initializes the sender and receiver.
void setupSerial() {
  String serialPortName = SerialUtils.findArduinoPort();
  if (serialPortName == null) {
    exit();
    return;
  }
  serialPort = new Serial(this, serialPortName, 9600);
  sender = new SerialRecord(this, serialPort, 3);
  receiver = new SerialRecord(this, serialPort, 2);
}
To set up the port, first replace “PORT_INDEX” by a number 0, like this:
myPort = new Serial(this, Serial.list()[0], 9600);Now, run the code, to verify that it detects the port that the Arduino is connect to. If it cannot detect this port, it will print a warning, and display a list of ports as in the following screenshot:
If this happens, replace the line String serialPortName = SerialUtils.findArduinoPort(); by String serialPortName = Serial.list()[*n*];, where n is the number from the list of ports that corresponds to your Arduino. For example, in the list above, port [1] has the name of a typical Arduino port, so use Serial.list()[1].
Now your Processing sketch is connected to the Arduino.
In the draw loop we will use a function serialRecord.read() ****to update the sensor values as they change.
void draw() {
  receiver.read();
}
Finally, you must call by the end of the draw loop the function sender.send**()**.
void draw() {
  receiver.read();
  sender.send();
}
In the example below, we will first use the values coming from Arduino to change the color and size of a circle. Then the code will change the value of receiver.values[1] that will control the LED on the Arduino. Notice that we are mapping the values collected from the mouse’s X position and convert it to be compatible with the DC motor range of speed values (0-255).
void draw() {
  background(0);
  // receive the values from the Arduino
  receiver.read();

  // use the values from the arduino
  // this is an example

  // sensorValues[1] are the values from the button
  if (receiver.values[1] == 1) {
    fill(random(255), random(255), random(255));
  }
  // sensorValues[0] are the values from the potentiometer
  float r = map(receiver.values[0], 0, 1023, 0, width);
  circle(width/2, height/2, r);

  // give values to the variables you want to send here
  // change the code according to your project

  if (mousePressed) {
    sender.values[0] = 1;
  } else {
    sender.values[0] = 0;
  }
  sender.values[1] = int(map(mouseX, 0, width, 0, 255));

  // end of example

  // send the values to the Arduino
  sender.send();
}
Appendix: Under the Hood
Under Construction
Note: The code above tells students how to copy, past, and configure the code in order to use it in their own sketches. If I were starting from scratch, I might instead them start with the examples and show them where to modify them. This is similar to how they can make use of the examples for other functionality, and the libraries that support various hardware devices.
In order to expose them to some of the material about arrays and Serial.print() that is hidden inside the library classes above, this section could sketch out the use of Serial.print() and Serial.println() as an alternative to SerialRecord; and to versions of reading and parsing numbers that are simpler and easier to explain than the previous tutorial (because they buffer the entire line into a string instead of reading it a character at a time), and simpler than the code in the library (because they don’t test for error conditions, and they don’t use a state machine like the Arduino reader does).
This separation would distinguish between learning just enough to use serial communication to transport multiple-value records, versus learning how this can be implemented.
Arduino
Processing
Serial.begin(9600);import processing.serial.*;
// inside setup();
String serialPortName = SerialUtils.findArduinoPort();
serialPort = new Serial(this, serialPortName, 9600);Or:
// inside setup();

// First time:
printArray(Serial.list());

// Subsequent times:
String serialPortName = Serial.list()[n];
serialPort = new Serial(this, serialPortName, 9600);Serial.print(value1);
Serial.print(",");
Serial.print(value2);
Serial.print(",");
Serial.print(value3);
Serial.println();serialPort.print(value1);
serialPort.print(",");
serialPort.print(value2);
serialPort.print(",");
serialPort.print(value3);
serialPort.println();©2020–2022 by Oliver Steele.